Creating An Email Account
Before proceeding, you'll be required to setup an e-mail address within cPanel before setting it up in Apple Mail. View the guide here: Guide: Creating an email account
If your email address already exists within cPanel, please proceed with following the instructions below.
The automatic setup guide is recommended as you will not be required to manually input any settings, simple download the configuration file using the steps below and your email account will be setup and ready to use. Please ensure that you're performing the steps below from the device that you wish to cofigure your email account on.
1. Log into cPanel (cPanel login guide)
2. Select the 'Email Accounts' option under the 'Mail' tab
3. If you haven't already created an email address, you may create one now
4. Select the 'More' button besides your email address
5. Select 'Configure Email Client' option
6. Depending on the version of Mac you're using:
Prior to Lion (10.4+)
Select the 'IMAP over SSL/TLS IMAP' option besides 'MacOS Mail.app for versions prior to Lion (10.4+)' and follow the on screen prompts
Lion (10.7+)
Select the 'IMAP over SSL/TLS IMAP' option besides 'MacOS Mail.app for Lion (10.7+)' and follow the on screen prompts
Mountain Lion (10.8+)
Select the 'IMAP over SSL/TLS IMAP' option besides 'iOS for iPhone/iPad/iPod and MacOS Mail.app for Mountain Lion (10.8+)' and follow the on screen prompts.
Once completed your email address will be automatically configured on device that you've downloaded this file onto.
Manual Configuration Guide
In this article we will assist you with adding and configuring a new email account in your Apple Mail. We assume that you have already created your email account within your cPanel account.
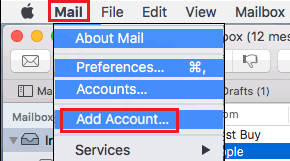
Step 1 - Click on Mail > Add Account.
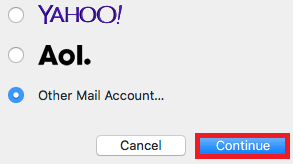
Step 2 - Select Other Mail Account and click on Continue.
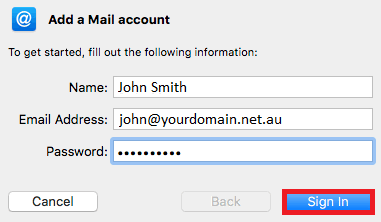
Step 3 - Add your details in and click Sign In.
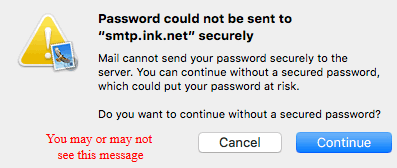
Step 4 - If you get this error, just click Continue.
Step 5 - Add your email details and click Sign In.
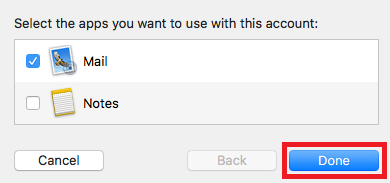
Step 6 - If the settings you entered were correct, you will see this screen. Make sure to untick Notes and click Done.

Step 7 - Test the email account by sending an email from / to your email address (e.g. from john@yourdomain.net.au to john@yourdomain.net.au). If this device can receive mail, the incoming server settings are correct. If the device can send mail, the outgoing server settings are correct as well.
Step 1 - Click on Mail > Add Account.

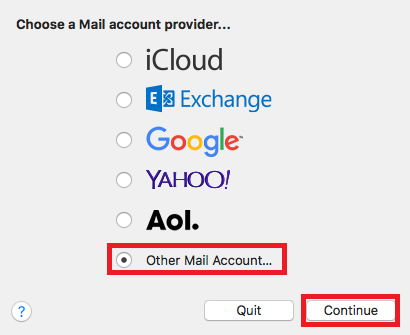
Step 2 - Select Other Mail Account and click Continue.
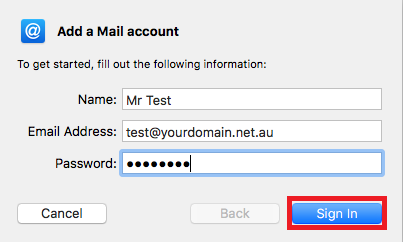
Step 3 - Input your name, email and password. You may get an error in red saying the account settings or password can't be verified. Ignore this for now and click Sign in.
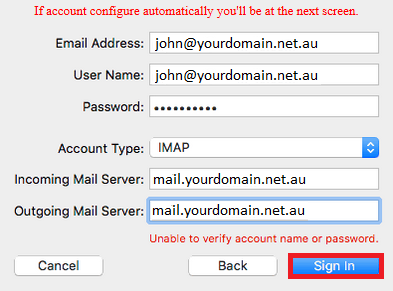
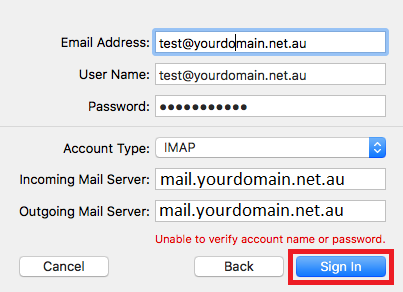
Step 4 - Input your details and click Sign In. You may get an error in red saying the account settings or password can't be verified. This error can safely be ignored for now.
Note: We recommend using IMAP instead of POP. Devices using POP download emails and remove them from the server, which can result in missing emails if the account is set up on more than one device. You can read more about this here.
Step 5 - If the settings you entered were correct, you will see this screen. Make sure to untick Notes and click Done.
Step 6 - Test the email account by sending an email from / to your email address (e.g. from john@yourdomain.net.au to john@yourdomain.net.au). If this device can receive mail, the incoming server settings are correct. If the device can send mail, the outgoing server settings are correct as well.
Before proceeding, you'll be required to setup an e-mail address within cPanel before setting it up in Apple Mail. View the guide here: Guide: Creating an email account
If your email address already exists within cPanel, please proceed with following the instructions below.
Automatic Setup Guide (Recommended)
The automatic setup guide is recommended as you will not be required to manually input any settings, simple download the configuration file using the steps below and your email account will be setup and ready to use. Please ensure that you're performing the steps below from the device that you wish to cofigure your email account on.
1. Log into cPanel (cPanel login guide)
2. Select the 'Email Accounts' option under the 'Mail' tab
3. If you haven't already created an email address, you may create one now
4. Select the 'More' button besides your email address
5. Select 'Configure Email Client' option
6. Depending on the version of Mac you're using:
Prior to Lion (10.4+)
Select the 'IMAP over SSL/TLS IMAP' option besides 'MacOS Mail.app for versions prior to Lion (10.4+)' and follow the on screen prompts
Lion (10.7+)
Select the 'IMAP over SSL/TLS IMAP' option besides 'MacOS Mail.app for Lion (10.7+)' and follow the on screen prompts
Mountain Lion (10.8+)
Select the 'IMAP over SSL/TLS IMAP' option besides 'iOS for iPhone/iPad/iPod and MacOS Mail.app for Mountain Lion (10.8+)' and follow the on screen prompts.
Once completed your email address will be automatically configured on device that you've downloaded this file onto.
Manual Configuration Guide
In this article we will assist you with adding and configuring a new email account in your Apple Mail. We assume that you have already created your email account within your cPanel account.
Older versions
Step 1 - Click on Mail > Add Account.
Step 2 - Select Other Mail Account and click on Continue.
Step 3 - Add your details in and click Sign In.
Step 4 - If you get this error, just click Continue.
Step 5 - Add your email details and click Sign In.
Step 6 - If the settings you entered were correct, you will see this screen. Make sure to untick Notes and click Done.
Step 7 - Test the email account by sending an email from / to your email address (e.g. from john@yourdomain.net.au to john@yourdomain.net.au). If this device can receive mail, the incoming server settings are correct. If the device can send mail, the outgoing server settings are correct as well.
Newer versions (Sierra and later)
Step 1 - Click on Mail > Add Account.
Step 2 - Select Other Mail Account and click Continue.
Step 3 - Input your name, email and password. You may get an error in red saying the account settings or password can't be verified. Ignore this for now and click Sign in.
Step 4 - Input your details and click Sign In. You may get an error in red saying the account settings or password can't be verified. This error can safely be ignored for now.
Note: We recommend using IMAP instead of POP. Devices using POP download emails and remove them from the server, which can result in missing emails if the account is set up on more than one device. You can read more about this here.
Step 5 - If the settings you entered were correct, you will see this screen. Make sure to untick Notes and click Done.
Step 6 - Test the email account by sending an email from / to your email address (e.g. from john@yourdomain.net.au to john@yourdomain.net.au). If this device can receive mail, the incoming server settings are correct. If the device can send mail, the outgoing server settings are correct as well.
Share via


Thank you for your feedback on this article.